When I started learning React, I didn't understand the concept of client-side and server-side rendering. And truth be told, it didn't even matter.
I was able to build React apps that worked properly. And this was enough for me, I was happy.
But later on, I learned about the way rendering works. And I discovered how server-side rendering can be beneficial for certain types of websites.
note
There is nothing wrong with rendering applications on the client-side. However, for some use cases, it's better to use server-side rendering.
Now I have a decent understanding of the difference between client-side and server-side rendering. But most importantly, I know when to use server-side rendering (SRR) in React.
Don't worry, I'll reveal all the information I have in this article. So if you want to understand SSR properly, read further!
Basics of Server-Side Rendering
Do you want to know if SSR is right for your type of application? Then you need to know what it is, and how it works. But don't worry, in this chapter, you're gonna learn that.
Server-side rendering (SSR for short) in React is the process of generating HTML markup on the server and sending it to the client.
note
Server-side rendering is not a default React mode of rendering. However, you can achieve it with additional configuration, or with the use of correct frameworks.
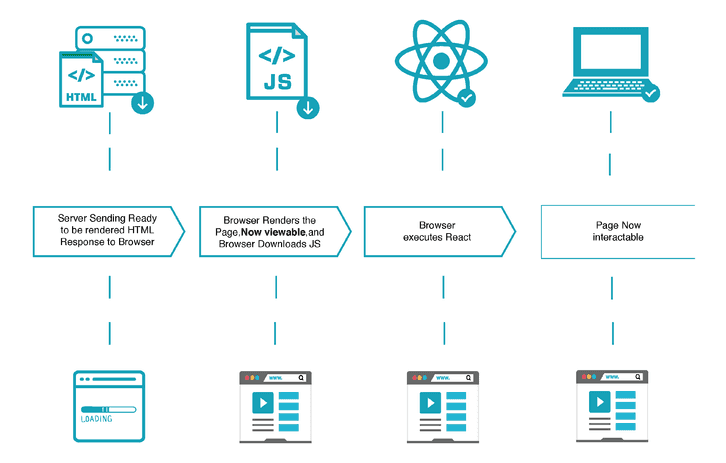
The process of rendering a page using SSR can be summed up to the series of following steps:
- When a user visits a page, the browser requests page content from the server.
- After HTML content is rendered, the browser starts to download JavaScript code.
- The browser executes React code.
- When React code is executed, the page is now interactable.
All of these steps are illustrated in the image below.
Image by ReactPWA
caution
Remember that after initial load, the page doesn't have to be interactable right away! This means that if you're trying to interact with the page, like clicking buttons, nothing might happen. This is because the JavaScript code is not downloaded yet.
Benefits of Server-Side Rendering
Now that we know the basics of SSR, let's talk about the benefits of this technique.
The most noticeable benefits of SSR are:
- Better indexing for SEO
- Better performance
- Faster load times on slow network
Now, we will discuss each one of them in more detail.
Improved SEO
As we already established, when using SSR, all the page content is sent to the browser by the server.
This is much more convenient for search engine crawlers because they don't have to execute any additional JavaScript to render the content of the page.
This will result in easier indexing of your website. And additionally, better SEO rank.
tip
If you want to achieve good SEO and rank higher on Google, SSR might be a good starting point.
Better Performance
We all love when our page is performing fast. And our users do too.
With server-side rendering, we can reduce the time taken for the page to load by half. On top of that, SSR also improves the perceived performance of your site.
Faster Load On Slow Network
Using SSR (even on slow networks), we can load our page faster. This is possible because the very first request is handled by the server, and the server is only returning the most important pieces of the website.
tip
If you want your website to be easily accessible on slow networks, SSR is the way to go.
When to Use SSR in React
Now that we know what are the benefits of server-side rendering. We can determine what are the correct use cases for it.
All of these use cases are based on the benefits of SSR. We discussed these benefits in more depth in the previous section.
note
We'll mention some of the best applications for server-side rendered applications. If your website doesn't fit into any category, don't be discouraged. Always do your research and decide based on it.
With all that being said, here is the list of correct applications for the usage of SSR.
You should use SRR in React when:
- You want to improve your SEO
- You want to load initial content faster
- You want to achieve better consistency of your app across all devices
Adding SSR to React
At this point, we covered the basics of SSR and when it's beneficial to use it.
Now, it's time to learn how to use it with React.
warning
It's possible to manually add SSR to a React app. However, we're strongly encouraging you to use a framework preconfigured with SSR. Don't worry, we'll show you the options to choose from.
tip
Using SSR React Framework
While it's possible to manually add SSR into React app, we always prefer to save time and energy by choosing a ready-to-go solution.
When it comes to React and SSR, there are 2 popular frameworks you should consider.
The most popular SSR frameworks for React are:
note
We will show you how to create a new React app that uses SSR with NextJS. However, don't be afraid to use Gatsby instead, if you prefer it.
info
Interesting fact: This site is built with Gatsby!
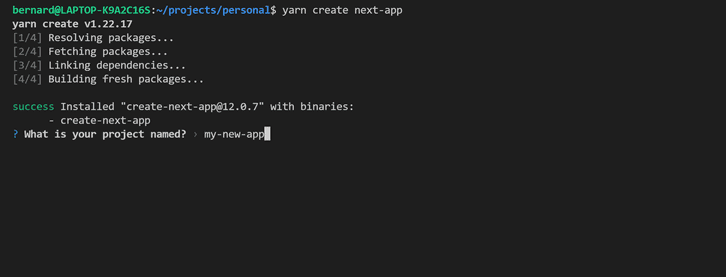
Let's start by creating a new NextJS application. In the terminal, run the following command.
npx create-next-app@latest
# or
yarn create next-app
You'll be prompted to choose a name for your app.
After a minute or two, your app is bootstrapped and ready to go. To start the application cd into the project folder.
cd my-new-appAnd start the development server.
npm run dev
# or
yarn dev
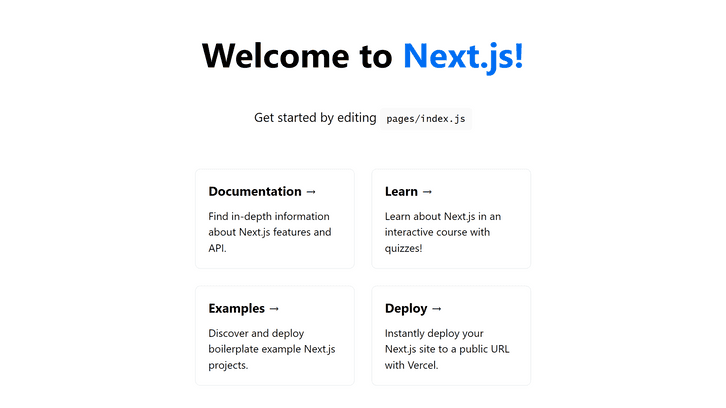
You should see the following screen.
note
The page you're seeing was rendered on the server.
We can test if the SSR truly works by running the following command in the terminal.
curl localhost:3000If you see the following output, your application is using SSR properly.
Formatted output of curl command
<!DOCTYPE html>
<html>
<head>
<style data-next-hide-fouc="true">body{display:none}</style>
<noscript data-next-hide-fouc="true">
<style>body{display:block}</style>
</noscript>
<meta name="viewport" content="width=device-width"/>
<meta charSet="utf-8"/>
<title>Create Next App</title>
<meta name="description" content="Generated by create next app"/>
<link rel="icon" href="/favicon.ico"/>
<meta name="next-head-count" content="5"/>
<noscript data-n-css=""></noscript>
<script defer="" nomodule="" src="/_next/static/chunks/polyfills.js?ts=1641929062578"></script><script src="/_next/static/chunks/webpack.js?ts=1641929062578" defer=""></script><script src="/_next/static/chunks/main.js?ts=1641929062578" defer=""></script><script src="/_next/static/chunks/pages/_app.js?ts=1641929062578" defer=""></script><script src="/_next/static/chunks/pages/index.js?ts=1641929062578" defer=""></script><script src="/_next/static/development/_buildManifest.js?ts=1641929062578" defer=""></script><script src="/_next/static/development/_ssgManifest.js?ts=1641929062578" defer=""></script><script src="/_next/static/development/_middlewareManifest.js?ts=1641929062578" defer=""></script>
<noscript id="__next_css__DO_NOT_USE__"></noscript>
</head>
<body>
<div id="__next" data-reactroot="">
<div class="Home_container__bCOhY">
<main class="Home_main__nLjiQ">
<h1 class="Home_title__T09hD">Welcome to <a href="https://nextjs.org">Next.js!</a></h1>
<p class="Home_description__41Owk">
Get started by editing<!-- --> <code class="Home_code__suPER">pages/index.js</code>
</p>
<div class="Home_grid__GxQ85">
<a href="https://nextjs.org/docs" class="Home_card___LpL1">
<h2>Documentation →</h2>
<p>Find in-depth information about Next.js features and API.</p>
</a>
<a href="https://nextjs.org/learn" class="Home_card___LpL1">
<h2>Learn →</h2>
<p>Learn about Next.js in an interactive course with quizzes!</p>
</a>
<a href="https://github.com/vercel/next.js/tree/master/examples" class="Home_card___LpL1">
<h2>Examples →</h2>
<p>Discover and deploy boilerplate example Next.js projects.</p>
</a>
<a href="https://vercel.com/new?utm_source=create-next-app&utm_medium=default-template&utm_campaign=create-next-app" class="Home_card___LpL1">
<h2>Deploy →</h2>
<p>Instantly deploy your Next.js site to a public URL with Vercel.</p>
</a>
</div>
</main>
<footer class="Home_footer____T7K">
<a href="https://vercel.com?utm_source=create-next-app&utm_medium=default-template&utm_campaign=create-next-app" target="_blank" rel="noopener noreferrer">
Powered by<!-- -->
<span class="Home_logo__27_tb">
<span style="box-sizing:border-box;display:inline-block;overflow:hidden;width:initial;height:initial;background:none;opacity:1;border:0;margin:0;padding:0;position:relative;max-width:100%">
<span style="box-sizing:border-box;display:block;width:initial;height:initial;background:none;opacity:1;border:0;margin:0;padding:0;max-width:100%"><img style="display:block;max-width:100%;width:initial;height:initial;background:none;opacity:1;border:0;margin:0;padding:0" alt="" aria-hidden="true" src="data:image/svg+xml;base64,PHN2ZyB3aWR0aD0iNzIiIGhlaWdodD0iMTYiIHhtbG5zPSJodHRwOi8vd3d3LnczLm9yZy8yMDAwL3N2ZyIgdmVyc2lvbj0iMS4xIi8+"/></span><img alt="Vercel Logo" src="data:image/gif;base64,R0lGODlhAQABAIAAAAAAAP///yH5BAEAAAAALAAAAAABAAEAAAIBRAA7" decoding="async" data-nimg="intrinsic" style="position:absolute;top:0;left:0;bottom:0;right:0;box-sizing:border-box;padding:0;border:none;margin:auto;display:block;width:0;height:0;min-width:100%;max-width:100%;min-height:100%;max-height:100%"/>
<noscript><img alt="Vercel Logo" srcSet="/_next/image?url=%2Fvercel.svg&w=96&q=75 1x, /_next/image?url=%2Fvercel.svg&w=256&q=75 2x" src="/_next/image?url=%2Fvercel.svg&w=256&q=75" decoding="async" data-nimg="intrinsic" style="position:absolute;top:0;left:0;bottom:0;right:0;box-sizing:border-box;padding:0;border:none;margin:auto;display:block;width:0;height:0;min-width:100%;max-width:100%;min-height:100%;max-height:100%" loading="lazy"/></noscript>
</span>
</span>
</a>
</footer>
</div>
</div>
<script src="/_next/static/chunks/react-refresh.js?ts=1641929062578"></script><script id="__NEXT_DATA__" type="application/json">{"props":{"pageProps":{}},"page":"/","query":{},"buildId":"development","nextExport":true,"autoExport":true,"isFallback":false,"scriptLoader":[]}</script>
</body>
</html>Concluding Thoughts
Server-side rendering is a thing that usually gets overlooked. Especially in the early stages of your React journey.
And there is nothing wrong with that. I didn't know about SSR for a long time.
However, if you want your application to perform better. And if you want it to be liked by the search engines, you should definitely consider using SSR.
In this article, you learned what SSR is, what are the benefits of SSR, when to use it, and most importantly, how to use it properly in React.
With all the information you learned, you can determine if SSR is something you should consider for your React app.


